
Cisco Firepower high availability is something we should take seriously into consideration when deploying the product. No production deployment should ever have a single device passing the traffic. With Cisco Firepower, we have several deployment options: we could have ASA 55xx-X devices running ASA code with Firepower services installed on the SSD drive and with the ASA redirecting desired traffic to the module. In this scenario, the failover is achieved on the ASA level and the Firepower software module is treated as any other ASA interface, which means that, when there is a problem with the Firepower software on the active ASA unit, the failover will occur and the traffic will flow through the standby unit, which becomes active now. The software in the standby module also begins passing traffic. This failover is long present with PIX/ASA and is described here.
Our second option for running Firepower is wiping the ASA code off from our 55xx-X devices and install the FTD software.
The third and final option is having new breed of hardware such as 21xx/41xx series and run the FTD code on them. We could, of course, run the ASA code on 21xx/41xx, but setting the failover on them is the same as with ASA55xx-X devices. Here we will deal with 21xx/41xx FTD failover.
First let’s see briefly requirements for failover (HA from now on). Both devices:
- Are the same model
- Have the same type of interfaces
- Have the same number of interfaces
- Are in the same domain and group
- Are running the same version of software
- Have normal health status
- Both are in the same operational mode (routed/transparent)
- Have the same NTP configuration
- Are fully deployed with no uncommitted changes
- Don’t have DHCP or PPPoE configured on any interface
Our devices should have a status similar to this:

Let’s assume that the primary unit is fully configured, tested and is passing the traffic. Before we begin creating the HA pair, we should make sure that everything is cabled correctly from the standby unit’s standpoint, the switch configuration is ok and so on. The standard HA configuration story. We should also enable two interfaces on both units. For example Ethernet1/11, which we will use for HA heartbeat and status messages and Ethernet1/12, which will be used for state tables replication. We could have only one link sharing these duties, but on these boxes we should expect lots of traffic, so separating these duties is probably a good idea. Let’s not forget to deploy our changes to both units, because if those interfaces are not enabled, the HA creation will fail:

When we have checked all the above, we begin setting our HA by clicking Devices->Device Management->Add->High Availability. We give this HA pair a name, select “Firepower Threat Defense” as device type and chose primary and secondary peer. This selection is very important, because the configuration from the primary peer overwrites that on the secondary peer. Then we click Continue:

The warning that pops up is self-explanatory. The Snort process will restart, which will cause the traffic outage on both units. In our case, the primary unit is in production and this process will cause the traffic interruption:

On the next dialog box we are given the opportunity to set up HA parameters, such as interfaces that will make HA tick, IP addresses, interface names and optional encryption of replicated traffic:

And the process of creating a HA pair begins:

We can watch the progress on the tasks or devices menu:

This could take some time and during that time we could see various warnings in our Health Center, but once the process completes, we should see all green and new logical object created. This object represent our new HA pair. We can also see that the policy on the standby unit is overwritten with the policy from the primary peer. We have to have the same policy on both peers:

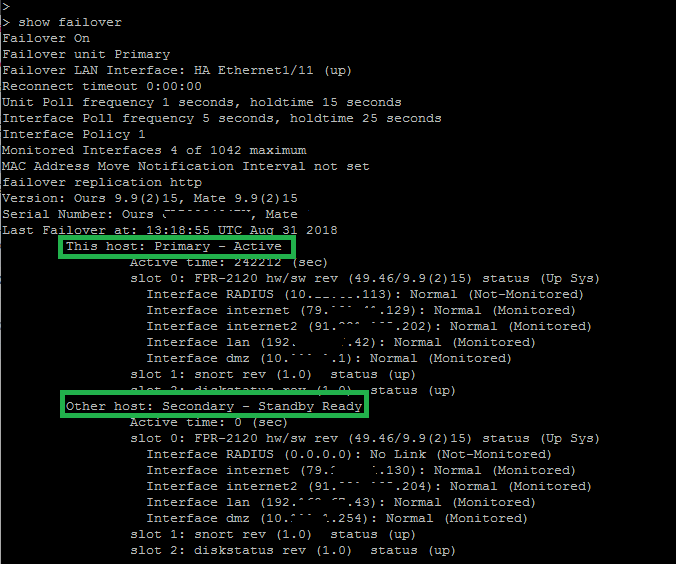
This was basic setup. We could log into FTD or LINA engines with SSH and verify this failover is running correctly bu issuing “show failover” command that we used to know with the ASA failover setup. A sharp eye will catch that the secondary unit is in failed state. Excellent observation, we will see later why this is the case…
Now it is time to tweak this setup a little bit, by clicking edit or pencil icon of the HA object. The advanced setup window opens:

Here we can see that only one interface is monitored and that no interfaces have secondary IPs. We need to fix this. Also, perhaps it is a good idea not to leave default MAC addresses on the interfaces but rather specify our own. So, let’s do this from the current window.
First we enable monitoring of each interface and specify standby IP address, for example:

Now for each interface we specify active and standby MAC addresses. We should make sure that these addresses will never appear on our network. Perhaps a good idea would be using aaaa.bbbb.cccc, where aaaa.bbbb is static part and cccc might be something that will easily remind us of what interface we are dealing with. So, for example Port-channel2.1000 primary MAC could be aaaa.bbbb.1000 and secondary aaaa.bbbb.1001. In a similar fashion for Port-channel1.40 we could have aaaa.bbbb.0040 and aaaa.bbbb.0041. This is just a suggestion, because this step is optional and HA will work without this setting. It just makes life easier should one device fail and should be replaced:

So our MAC address settings part should look like this:

After applying our changes, we should have all green on our HA logical entity:

Because HA part is handled by the ASA or LINA engine, we can still use familiar trouble shooting commands from CLI:

Here we can see that the other unit has failed. This is because primary unit has RADIUS interface configured and the other unit does not. This was a test interface only needed on one unit for a limited period, we can disable monitoring of this interface and reapply our policies:

Now we should have a clear situation on both peers:

That is all for now.


0 Comments