In every organization there will always be the need to have administrators of some sort manage some number of the machines in the domain. We also want to follow the path of least privilege, so using your Domain Admin (DA) account to do your daily admin tasks is not going to cut it. Remember, DA accounts should only be used for tasks that require such privileges, tasks such as Finding Lockout Sources in Active Directory. A Domain Admin should not be used for logging into a random workstation or server to perform certain tasks. For this reason, we need the ability to add local administrators via GPO and separate privileges for admin accounts.
Best Practices is an admin that has a DA account should have the following accounts with privileges.
- Domain Admin: Used for very limited tasks that actually require DA access.
- Server Admin: Used for logging into servers. This account is NOT a Domain Admin and is not an admin on any workstations.
- Workstation Admin: Used for administering end user workstations. This account is NOT a Domain Admin and is not an admin on any Servers.
- Regular Account: Account used for email and general day to day tasks. This account is not an admin on any servers or any end user workstations.
Typically, I find that it is generally easy to remember if you insert a prefix along with your username.
- da-bsmith: Domain Admin Account.
- sa-bsmith: Server Admin Account.
- wa-bsmith: Workstation Admin Account.
- bsmith: Regular everyday account.
Add Local Administrators via GPO (Group Policy)
So unless you already have delegated privileges, you will need Domain Admin access to enable or create group policies (ironically enough). Here are the steps to add local administrators via GPO.
- Open Group Policy Management Editor (GPMC)
- Create a New Group Policy Object and name it Local Administrators – Servers
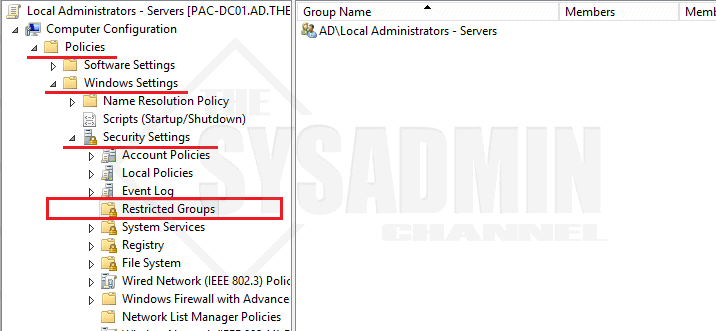
- Navigate to Computer Configuration -> Policies -> Windows Settings -> Security Settings -> Restricted Groups. Right Click on the right panel and select Add Group
- Browse for the Active Directory Group you wish to add as a local admin
- Select This group is a member of (#1 Below) – This step is extremely important. Selecting Members of this group will wipe out all current admins.
- Select Browse (#2)
- Type Administrators (#3) – Note: Be sure to add “s” at the end
- Click Check Names (#4) to make sure it resolves and click OK
- Close out of the window
- Highlight the Local Administrators – Server Policy and go to the Details Tab. On the GPO Status Dropdown select User Configuration Settings Disabled
- The final GPO should look like my screenshot below
Apply the Group Policy to your Organizational Unit
- Right Click your preferred OU and select Link an Existing GPO
- Select Local Administrators – Servers GPO
- Close out of GPMC.
Verifying Your Group Policy Works
- Login to any server in the OU you applied the policy to
- Open up a command prompt or Powershell Window
- Type GPUpdate /force
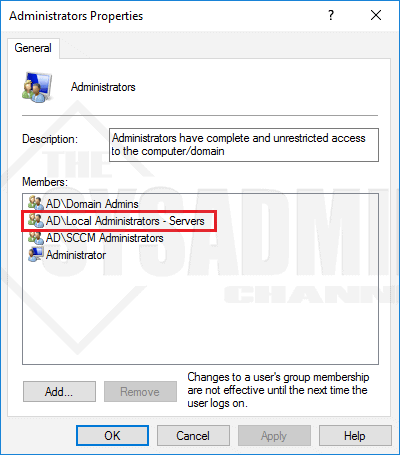
- Check Local Adminstrators Group and you group should be added


0 Comments